How to mount hard drive as folder on Windows 10
If you have multiple drives on your device, you can use this guide to ditch the drive letter and mount the storage as a folder on Windows 10.
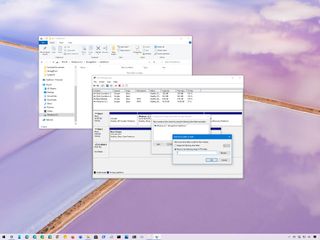
On Windows 10, when the hard drive starts to run out of space, you usually add another to extend the available storage. Although it is a quick solution, as time goes on, you could end up with a long list of drives on your computer, which sometimes may not be the best approach to organize your data.
Instead of using other solutions like Storage Spaces or Redundant Array of Independent Disks (RAID) to combine drives into a logical volume, Windows 10 also allows you to mount a hard drive to a folder rather than using a drive letter. This approach will not only reduce the number of drive letters, but it will also help you to organize your drives better.
Furthermore, this is also an ideal solution when you share a folder on the network, and the storage is running out of space. Instead of creating a new network share, you can simply assign a mount-point folder path to a hard drive inside the folder already shared in the network to make more storage available.
In this Windows 10 guide, we will walk you through two ways to mount a hard drive as a folder on your device using the Disk Management console.
- How to assign folder path mount-point to drive with data on Windows 10
- How to assign folder path mount-point to drive without data on Windows 10
How to assign folder path mount-point to drive with data on Windows 10
To mount a drive with data as a folder with Disk Management, use these steps:
- Open File Explorer.
- Browse to the folder location you want the mount-point to appear.
- Click the New folder button from the "Home" tab.
- Confirm a name for the folder – for example, StoragePool.
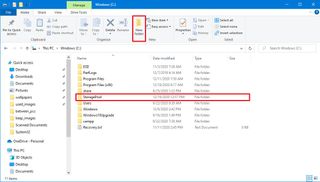
- Open the newly created folder.
- Click the New folder button from the "Home" tab to create a folder to mount the drive – for example, HardDrive1.
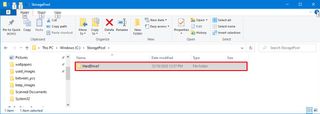
- (Optional) Repeat step No. 6 to create an additional folder depending on the number of hard drives you want to mount as folders.
- Open Start.
- Search for Disk Management and click the top result to open the console.
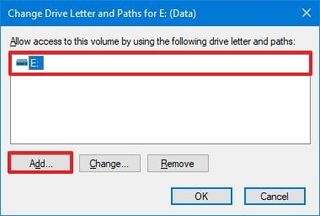
- Right-click the drive you want to mount and select the Change Drive Letter and Paths option.
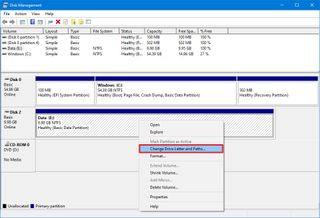
- Click the Add button.
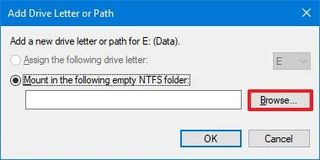
- Select the Mount in the following empty NTFS folder option.
- Click the Browse button.
- Select the folder you created on step No. 6.
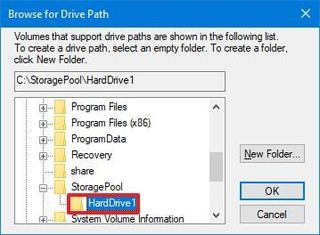
- Click the OK button.
- Click the OK button again.
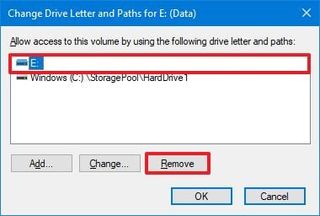
- (Optional) Right-click the drive again and select the Change Drive Letter and Paths option.

- Select the current drive letter (not the mount point).
- Click the Remove button.
- Click the Yes button.
Once you complete the steps, the secondary hard drive will now be accessible from the folder location you created.
How to assign folder path mount-point to drive without data on Windows 10
To mount an empty drive as a folder with Disk Management, use these steps:
Get the Windows Central Newsletter
All the latest news, reviews, and guides for Windows and Xbox diehards.
- Open File Explorer.
- Browse to the folder location you want the mount-point to appear.
- Click the New folder button from the "Home" tab.
- Confirm a name for the folder – for example, StoragePool.

- Open the newly created folder.
- Click the New folder button from the "Home" tab to create a folder to mount the drive – for example, HardDrive1.

- (Optional) Repeat step No. 6 to create an additional folder depending on the number of hard drives you want to mount as folders.
- Open Start.
- Search for Disk Management and click the top result to open the console.
- Right-click the empty drive you want to mount as a folder and select the New Simple Volume option.
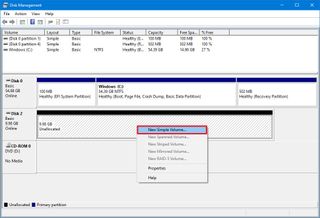
- Click the Next button.
- Click the Next button again.
- Select the Mount in the following empty NTFS folder option.
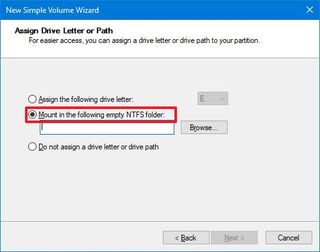
- Click the Browse button.
- Select the folder you created on step No. 6.
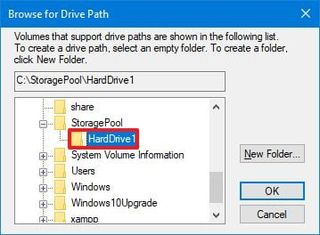
- Click the OK button.
- Click the Next button again.
- Select the Format this volume with the following settings option.
- Use the default settings for "file system," "allocation unit size," and "volume label" options.
- Check the Perform a quick format option.
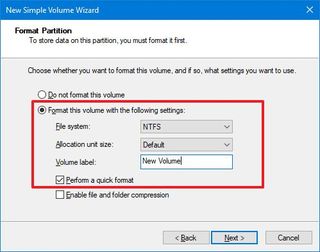
- Click the Next button.
- Click the Finish button.
After you complete the steps, the new drive will be formatted and mounted as a folder from the specified folder.
When using this solution, each drive will continue to work independently without redundancy, which means that if a drive fails, you will lose the data on that drive, but not on the others. If you have important data, it is always recommended to periodically create a backup.
Mauro Huculak is technical writer for WindowsCentral.com. His primary focus is to write comprehensive how-tos to help users get the most out of Windows 10 and its many related technologies. He has an IT background with professional certifications from Microsoft, Cisco, and CompTIA, and he's a recognized member of the Microsoft MVP community.

