How to manage time servers on Windows 10
If your device is showing the wrong time, and it's not a time zone issue, you can try changing the Internet Time settings on Windows 10 to fix the problem.
Windows 10 uses the Network Time Protocol (NTP) to connect with time servers on the internet to provide accurate system time. Otherwise, if the clock is not correctly synchronized, you could experience network issues, and documents and other files you create may end with incorrect time stamps.
Although for the most part, the default time server is reliable, there will be times when you may need to change it, such as if your current configuration causes your device to display the wrong time, you just prefer to use a different service, or your company uses a specific configuration.
Whatever the reason, on Windows 10 it's possible to switch time providers, and you can even add custom time servers to the list as necessary.
In this Windows 10 guide, we walk you through the steps to use different time servers to make sure that your computer is getting the correct time using Control Panel.
- How to change the time server on Windows 10
- How to add new time servers on Windows 10
- How to troubleshoot time server synchronization problems
How to change the time server on Windows 10
- Open Control Panel.
- Click on Clock, Language, and Region.
- Click on Date and Time.
- Click on the Internet Time tab.
- Click the Change settings button.
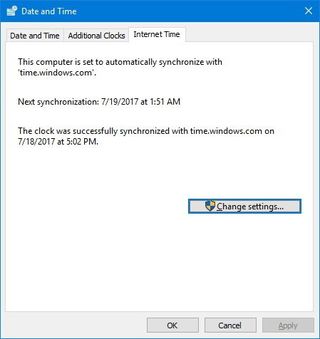
- Check that the Synchronize with an internet time server option is selected.
- Use the drop-down menu to select a different server.
- Click the Update now button to synchronize the time with the new server.
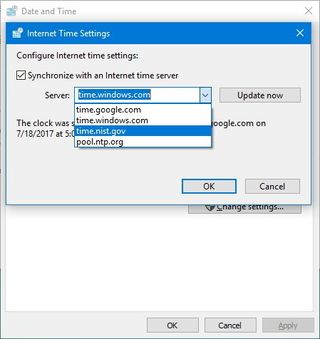
- Click OK.
- Click Apply.
- Click OK.
After completing the steps, Windows 10 will keep the time synchronized over the internet with the server you selected.
How to add new time servers on Windows 10
If you prefer to use a different time server that isn't in the list, it's also possible to include any NTP server you want.
- Open Control Panel.
- Click on Clock, Language, and Region.
- Click on Date and Time.
- Click on the Internet Time tab.
- Click the Change settings button.

- Check that the Synchronize with an internet time server option is selected.
- Click the drop-down menu, and next to "Server," and type the new address of the time server.
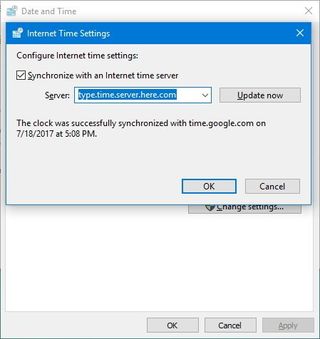
- Click the Update now button to resynchronize.
- Click OK.
- Click Apply.
- Click OK.
After adding the new configuration, you can quickly verify everything is working as expected by checking the Internet Time tab, which now should include a "The clock was successfully synchronized" message with the link to the NTP server and date and time of the synchronization.
Get the Windows Central Newsletter
All the latest news, reviews, and guides for Windows and Xbox diehards.
Adding new time servers using the Registry
Using Control Panel, you can change the Internet Time settings to anything, but the list only allows you to store one extra entry. If you want to add multiple addresses to the list, you'll need to use the Registry.
Warning: This is a friendly reminder that editing the Registry is risky, and it can cause irreversible damage to your installation if you don't do it correctly. It's recommended to make a full backup of your PC before proceeding.
- Use the Windows key + R keyboard shortcut to open the Run command.
- Type regedit, and click OK to open the Registry.
- Browse the following path:
HKEY_LOCAL_MACHINE\SOFTWARE\Microsoft\Windows\CurrentVersion\DateTime\Servers - On the right side, right-click on the Servers (folder) key, select New, and click on String Value.
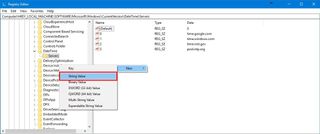
- Type a number that corresponds to the position of the new entry in the server drop-down menu in Control Panel.
- Double-click the newly created String Value.
- Type the address of Network Time Protocol (NTP) server. For example, if you want to use the Google Public NTP server, you can enter time.google.com.
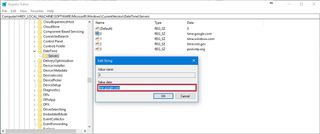
- Click OK.
Once you completed the steps, you can use the instructions to change the time server, but on step No. 6 select the newly added server and don't forget to click the Update now button.
How to troubleshoot time server synchronization problems
If after changing the settings, your device still has problems connecting to the NTP server, you can reset the Windows Time service configurations using Command Prompt.
- Open the Start menu.
- Search for cmd.exe, right-click the result, and select Run as administrator.
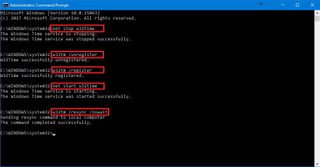
- Type the following command to disable the Windows Time service and press Enter:
net stop w32time - Type the following command to unregister the Windows Time service and to remove all settings information from the registry and press Enter:
w32tm /unregister - Type the following command to register the Windows Time service and to load the default settings to the registry and press Enter:
w32tm /register - Type the following command to start the Windows Time service and press Enter:
net start w32time - Type the following command to force your computer to synchronize your computer without waiting and press Enter:
w32tm /resync /nowait
- Restart your computer.
Once you completed the steps, your device should now synchronize with its clock over the internet.
More Windows 10 resources
For more helpful articles, coverage, and answers to common questions about Windows 10, visit the following resources:
- Windows 10 on Windows Central – All you need to know
- Windows 10 help, tips, and tricks
- Windows 10 forums on Windows Central
Mauro Huculak is technical writer for WindowsCentral.com. His primary focus is to write comprehensive how-tos to help users get the most out of Windows 10 and its many related technologies. He has an IT background with professional certifications from Microsoft, Cisco, and CompTIA, and he's a recognized member of the Microsoft MVP community.

